Thursday, 2 June 2011
Thursday, 5 May 2011
Solutions in CRM 2011
Note : Deleting an Unmanaged Solutions will delete the Solution but will not delete the components.
Note : Deleting an Managed Solution will delete the Solution and Components both (except the Components that are the part of another solution including Default(System) solution )The follow options are available for modifying Solution Components:-
Creating a New Component: When you will create the New Components in Solutions, this action will create the component on the system, and create a reference to it in the Solution.
Adding an Existing Component: When you will add an existing component, where you have the choice to include the related components or not , Two specific components can be added here for which there is no New option; Site Map and Application Ribbon.
Delete: This will remove the component from the system. It also removes any references to the component in unmanaged Solutions. You may not be allowed to do this if the component is part of managed Solutions.
Remove: This option removes the reference to the component from the Solution. If you are trying to Remove two or more components at the same time, you may see the error i.e. "You can only Perform this Action on Records with the same type."
Publish: Changes to components may need to be published before they take effect. This does not apply to all changes, but for those that need Publishing, this button will do it.
Show Dependencies: Components frequently depend on other components. For example, relationships depend on the entities they relate to, and charts depend on data from entities, and so on. For component X, this button will present a dialog box showing the components that depend on X, and the components upon which X depends. This is useful for checking before a component is deleted (you will not be allowed to delete it if other components depend on it). It also tells you what components must be in your Solution or guaranteed to present on the target System when the Solution is imported.
Add Required Components: Because of dependencies between components, you may need to include other components in your Solution to make the existing component function. When you add an existing component, the system will ask you if you want to include the components it depends on (if any). The Add Required Component button will check the current component and add to the Solution any other components it depends on.
Export/Import Solutions
- For Export : Only Unmanaged Solution can be Exported
- For Import : You can import the solution as Managed or as Unmanaged
- When an unmanaged Solution is imported, the customizations it contains
- overwrite any customizations already in place. This applies only to
- customizations explicably present in the Solution.
- EXAMPLE: Joe exports his Vacation Solution, which contains a custom entity,
- as unmanaged. He then adds a field to the entity named Special to store a bit
- value. He adds the field to the form for the entity as a check box. The form is used
- so that data in the Special field is accumulated for some records. Joe then
- imports his Solution from the file he exported. When he publishes the changes
- and looks at the form, he finds his Special field disappeared. However, the field
- is still available to add to the form.
- In the preceding example, the customization placing the field on the form is
- overwritten by the import. However the field (and the data in it) is left intact
- since it is not explicitly referenced.
- If an import contains changes that conflict with existing data, it will fail.
- EXAMPLE: Connie exports a Solution as unmanaged containing a Customer
- Interest entity. The entity contains a field called Interest Time of data type
- Integer. After the export, Pete deletes the Interest Time field from the entity.
- Connie recreates the field but, although she specifies the same name, she makes
- the new field Date and Time. If Connie tries to import the Solution she exported
- earlier, the import will fail. The Import Summary screen will show that the
- failure occurred in the Customer Interest component.
- In the preceding example,Connie can downloaded the log file to see the error.
Permissions Required
- By default, only the System Administrator and System Customizer have these permissions, but you can set them on any other Security Role you choose.
EXAMPLE: A Solution is exported as unmanaged and includes System Settings under General. The Solution contains references to three new entities. The Name Format at the time the Solution is exported is set to First Name Last Name. The Solution is imported onto an organization for which the Name Format is Last Name First Name. The import changes the name format for all name fields in all entities, not just the three custom entities in the Solution.
CRM 2011 - Web Services Path
CRM 2011 Discovery and Web Service URL’s to use, based on the Developer Resources Page in CRM.
Here is the information that you need:
For CRM Online customers:
The following URLs should be used to access the discovery service (use the appropriate URL for your location):
https://dev.crm.dynamics.com/XRMServices/2011/Discovery.svc
https://dev.crm4.dynamics.com/XRMServices/2011/Discovery.svc
https://dev.crm5.dynamics.com/XRMServices/2011/Discovery.svc
https://dev.crm4.dynamics.com/XRMServices/2011/Discovery.svc
https://dev.crm5.dynamics.com/XRMServices/2011/Discovery.svc
For CRM On-premises customers:
http://{server:port}/XRMServices/2011/Discovery.svc for the Discovery service endpoint
http://{server:port}/{OrgName}/XRMServices/2011/Organization.svc for the Organization Service endpoint (SOAP)
http://{server:port}/{OrgName}/XRMServices/2011/OrganizationData.svc
http://{server:port}/{OrgName}/XRMServices/2011/Organization.svc for the Organization Service endpoint (SOAP)
http://{server:port}/{OrgName}/XRMServices/2011/OrganizationData.svc
How to Change Language in CRM 2011
Hi,
I am going to share here how to install a language pack, enable it and then change the UI language of the logged user. In essense, all the steps required to change the language. In particular, some steps may be not so easy to realize how they are in 2011.
So, I decided to share here the step by step. The example is based on the installation and configuration of the Spanish language pack (my native language BTW) but it does apply to any other language.
Step by step: changing the language in Dynamics CRM 2011
1. Download the corresponding language pack from here.
It’s important to note the following:
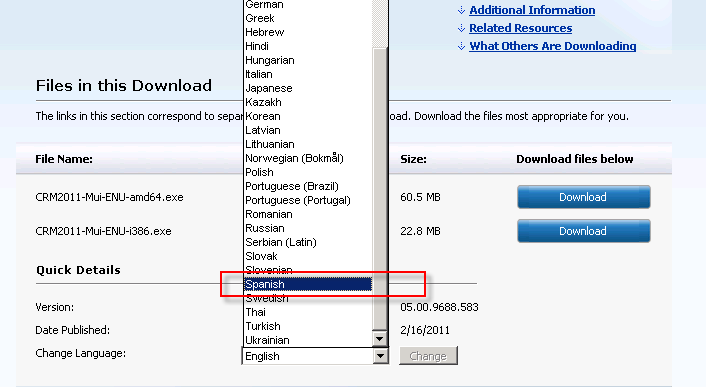
- before downloading the packacge, you have to select the language in the 'Change Language' combo box and press ‘Change’ as shown below:
- Language pack has to be installed not only in the server but also on the clients which are using Outlook. This will apply localization to CRM client actions (i.e. Track button)
- Labels and entity-level actions strings come from server, so that will be localized without installig language pack as far as the user changes his/her language preferences.
- Another way is: if user still didn't installed Outlook client and sets his personal language setting in the web client first (to say Spanish for example) and then clicks on the “Get CRM For Outlook” button in the web, the installation is automatically redirected to the Spanish version of the client and user gets all UI (coming from the server like ribbons and local to the client like Track in CRM form region) in Spanish.
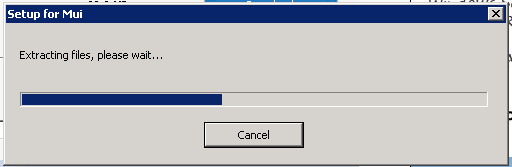
2. Once downloaded, start the installation of it. In the first step, we will be asked to select a folder to extract the content of the package to.
3. After extraction, setup wizard starts automatically and asks us to accept the licensing terms and conditions. Press ‘Install' to continue.
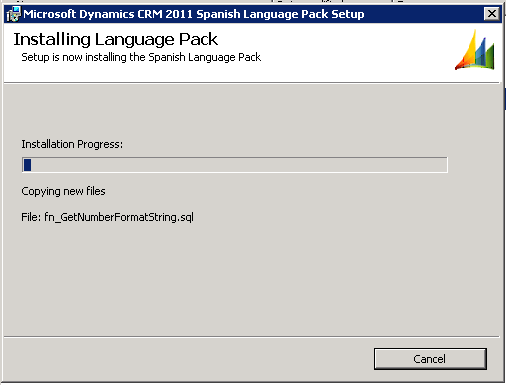
4. Installation starts..
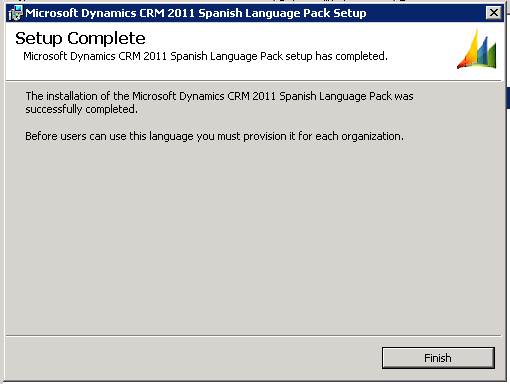
5. Installation continues and succeeds. Just press ‘Finish’.
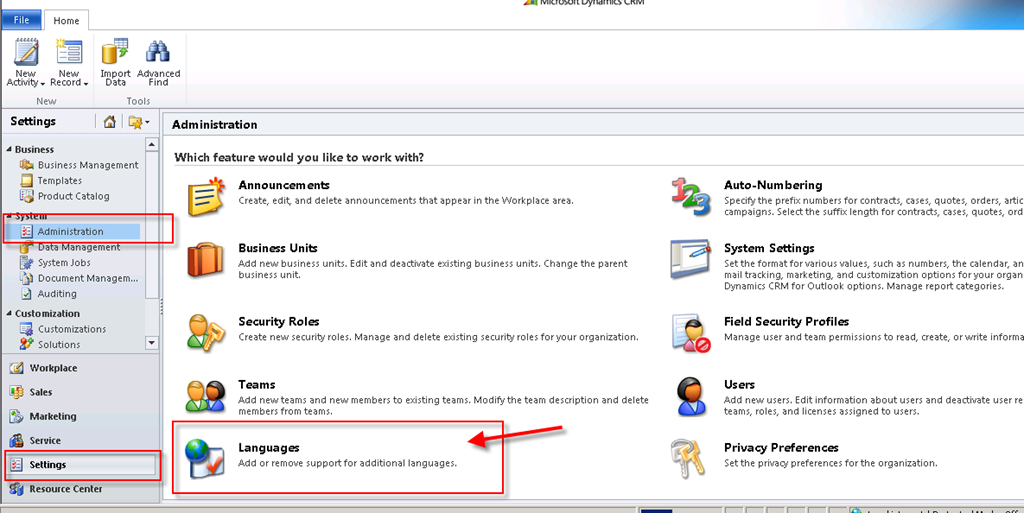
6. Once installed the package we need to enable it so it can be used by the users and also us as administrators. For doing so, logged as administrator, go to Settings->Administration and press 'Languages'.
This is an only once operation (unless you decide to disable it later for any reason).
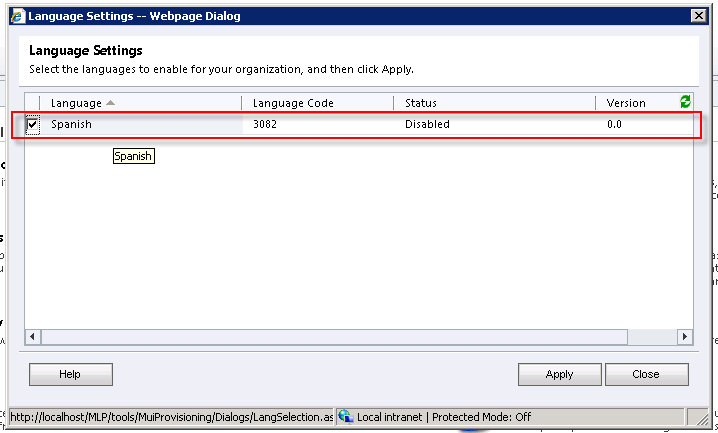
7. A new dialog pops up where we are able to choose the language or languages to enable. (spanish in the example)
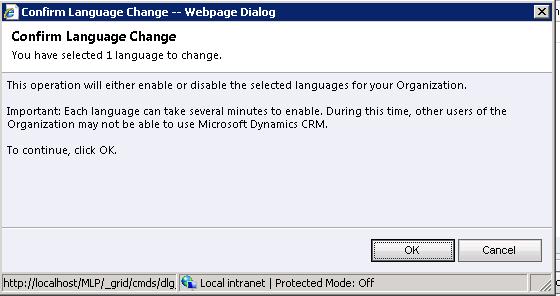
8. Press ‘Apply’ to enable the language pack. A new dialog pops up asking for confirmation and warning that the operation may take sevaral mins..
9. Press ‘OK’ to enable the package…
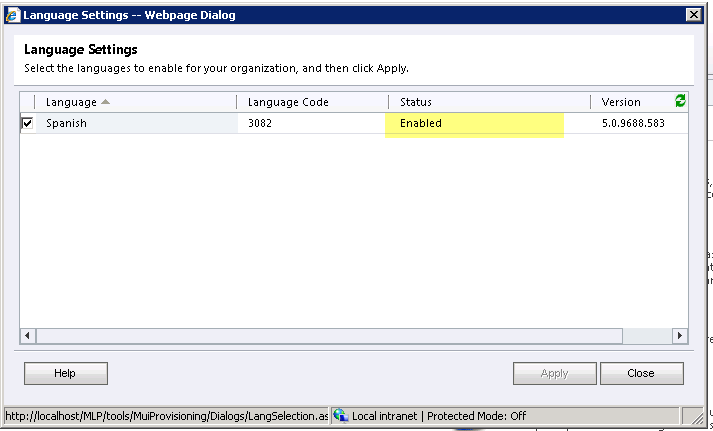
10. Once finished, the package should change its state to ‘Enabled’.
Now, it’s available to be chose by you and the rest of the users.
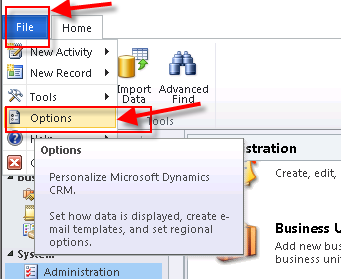
11. Up to this point we enabled the package but still didn’t change the UI language at all. To actually change the UI language in the CRM web application, you have to click on File->Options in the ribbon, as shown here:
Note: In case of Outlook, you need to go to File->CRM->Options.
12. Within Options window, go to ‘Languages’. Now you can choose the new language both for the UI and the help pages as shown below.
Base language (english in this case) is shown only for information purposes, in read-only mode as it cannot be changed once the organization is created.
13. Press ‘OK’ to apply the change.
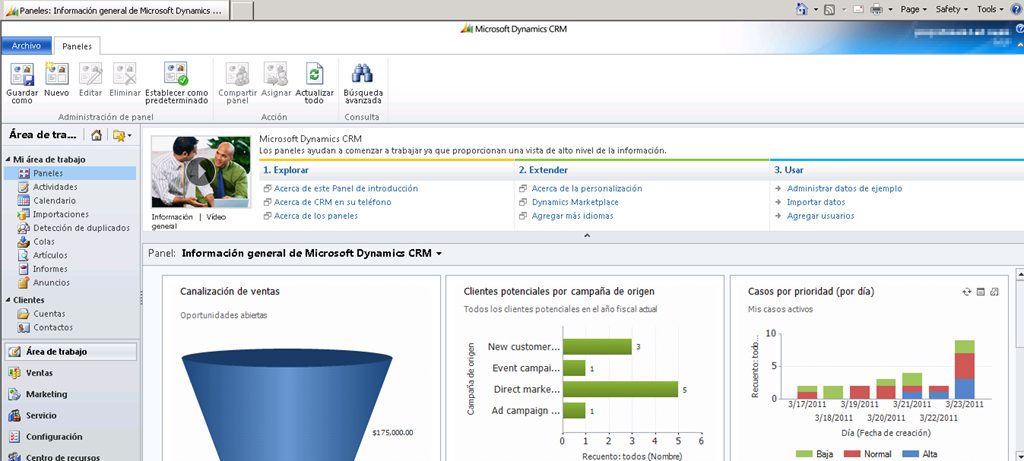
14. Now, the web application is automatically refreshed and we should see the UI in the desired language.
Important:
Bear in mind that as administrators / customizers if we need to customize any entity and/or solution, this can only be done if the logged user is using the base language(english in this case).
Hence, if we will need to change the language back to base language in case we changed our default preference. On the contrary, the customization options will be disabled as shown below:
Hope you find this useful,
Monday, 2 May 2011
CRM Certifications
Note Microsoft Certified Business Management Solutions Professional certifications have been renamed to Microsoft Certified IT Professional certifications.
Microsoft Dynamics CRM 2011 Customization and Configuration
Exam MB2-866:
About this Exam This certification exam measures your ability to understand and articulate how to customize and configure Microsoft Dynamics CRM 2011 including configuring a Microsoft Dynamics CRM organizational structure, managing users & teams and security, customizing attributes and entities, customizing relationships and mappings, configuring auditing, managing forms & views and charts, and implementing a Microsoft Dynamics CRM solution.Exam Topics Covered The following list includes the topic areas covered on this exam.- Configuring a Microsoft Dynamics CRM Organizational Structure
- Managing Users & Teams and Security
- Customizing Attributes and Entities
- Customizing Relationships and Mappings
- Configuring Auditing
- Managing Forms, Views, and Charts
- Implementing a Microsoft Dynamics CRM Solution
Audience Profile This exam is intended for Microsoft Dynamics CRM Implementation Consultants and Customizers who will configure the application’s organizational settings and customize the application using built-in customization tools.
Additional Skills Recommended:Must have a working knowledge of Microsoft Dynamics CRM 2011 usage and of solving real-world business problems by using Microsoft Dynamics CRM 2011. It is recommended, but not required, that examinees have completed Microsoft Dynamics CRM 2011 Applications training.
Microsoft Certified IT Professional – Applications for Microsoft Dynamics CRM 4.0
Note You must pass the one required exam and two elective exams to obtain a certification.
Exam title | Exam number |
|---|---|
Required: Microsoft Dynamics CRM 4.0 Applications | |
Elective: Microsoft Dynamics CRM 4.0 Customization and Configuration | |
Elective: Microsoft SQL Server 2005 – Implementation and Maintenance Or Microsoft SQL Server 2008, Implementation and Maintenance | |
Elective: Configuring Windows Vista Client | |
Elective: Deploying Business Desktops with Windows Server 2003 and Microsoft Office 2003 |
Microsoft Certified IT Professional – Developer for Microsoft Dynamics CRM 4.0
Note You must pass two required exams and two elective exams to obtain a certification.
Exam title | Exam number |
|---|---|
Required: Microsoft Dynamics CRM 4.0 Customization and Configuration | |
Required: CRM 4.0 Extending Microsoft Dynamics or Extending Microsoft Dynamics CRM 3.0 | or |
Elective: Microsoft Dynamics CRM 4.0 Applications | |
Elective: Microsoft .NET Framework – Application Development Foundation | |
Elective: Developing and Implementing Windows-Based Applications with Microsoft Visual Basic .NET and Microsoft Visual Studio .NET Note This exam is retired, but if you already passed it, you can apply it toward this certification. Or Developing and Implementing Windows-Based Applications with Microsoft Visual C# .NET and Microsoft Visual Studio .NET Note This exam is retired, but if you already passed it, you can apply it toward this certification. | Exam 70-306 Exam 70-316 |
Elective: Microsoft .NET Framework 2.0 – Distributed Application Development Or Microsoft .NET Framework 3.5 – Windows Communication Foundation Application Development | |
Elective: Microsoft .NET Framework 2.0 – Web-Based Client Development | |
Elective: Microsoft .NET Framework 2.0 – Windows-Based Client Development |
Microsoft Certified IT Professional – Installation and Deployment for Microsoft Dynamics CRM 4.0
Note You must pass the one required exam and three elective exams to obtain a certification.
Exam title | Exam number |
|---|---|
Required: Microsoft Dynamics CRM 4.0 Installation and Deployment | |
Elective: Microsoft Dynamics CRM 4.0 Customization and Configuration | |
Elective: Microsoft SQL Server 2005 – Implementation and Maintenance Or Microsoft SQL Server 2008, Implementation and Maintenance | |
Elective: Exchange Server 2007, Configuring | |
Elective: Windows Server 2008 Network Infrastructure, Configuring | |
Elective: Windows Server 2008 Applications Infrastructure, Configuring | |
Elective: Windows Server 2008, Enterprise Administrator |
CRM 2011 - Mobile Express
If you’ve worked with Mobile Express in CRM 4.0, then you’re probably used to navigating to Settings –> Customization –> Customize Mobile Express. In CRM 2011 the navigation has changed so that Mobile Express configuration exists within each entity.
For example, if you want to enable Accounts for Mobile Express, go to Settings –> Customization –> Customize the System –> click on the Account entity, and make sure that the checkbox for Mobile Express is checked:
Then, navigate to Forms underneath the entity and find the mobile form:
Open the form and select the fields you want to appear within Mobile Express and remove unnecessary ones.
Publish your changes and test on your mobile device by entering the URL of your organization with a “/m” after the URL (example: http://crm/AdventureWorksCycle/main.aspx/m)
Subscribe to:
Posts (Atom)